
Gaming world has gone to a whole new 3d level but the fun of retro gaming just still isn’t dead. Unfortunately, things have changed and we’ve all had to upgrade our computers and laptops with time and almost none of them now support our good old nine-pin gamepad controllers any more. But now with the help of JoyPad, a cool app available on App Store, you can easily turn your iPhone / iPod touch into a good old 2-button or 6-button game controller to go with your favorite Mac & PC emulators such as MAME, SNES, SEGA Genesis, N64 and so on!

So here is how you do it
Step 1:
Download JoyPad on your iPhone or iPod touch. The Lite version is free while Pro version costs $4.99 ($2.99 on sale!)
Step 2:
Download and install JoyPad Desktop Client. Available free for both PC and Mac.
Step 3:
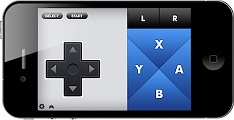
Open JoyPad on your iPhone / iPod and select your controller layout (2 button / 6 button) by tapping the small controller icon.

Step 4:
Open up JoyPad desktop client and make sure your iPhone / iPod is on same WiFi network. Select your device from the list and you’ll see status as “Connected” in green if everything is working. You can also connect your iPhone / iPod manually by entering its wifi address (note it down from JoyPad app’s settings on your iOS device) in the “Connect Manually” field.

Step 5:
Now select a configuration according to your emulator form one of the presets or edit / create a new one. Once done, fire up your favorite emulator and you’re good to go. You can also connect another iPhone / iPod as a second controller by opening a new configuration window from JoyPad desktop client.
Enjoy!